iPhone one-click post-processing.


… and there is no description.
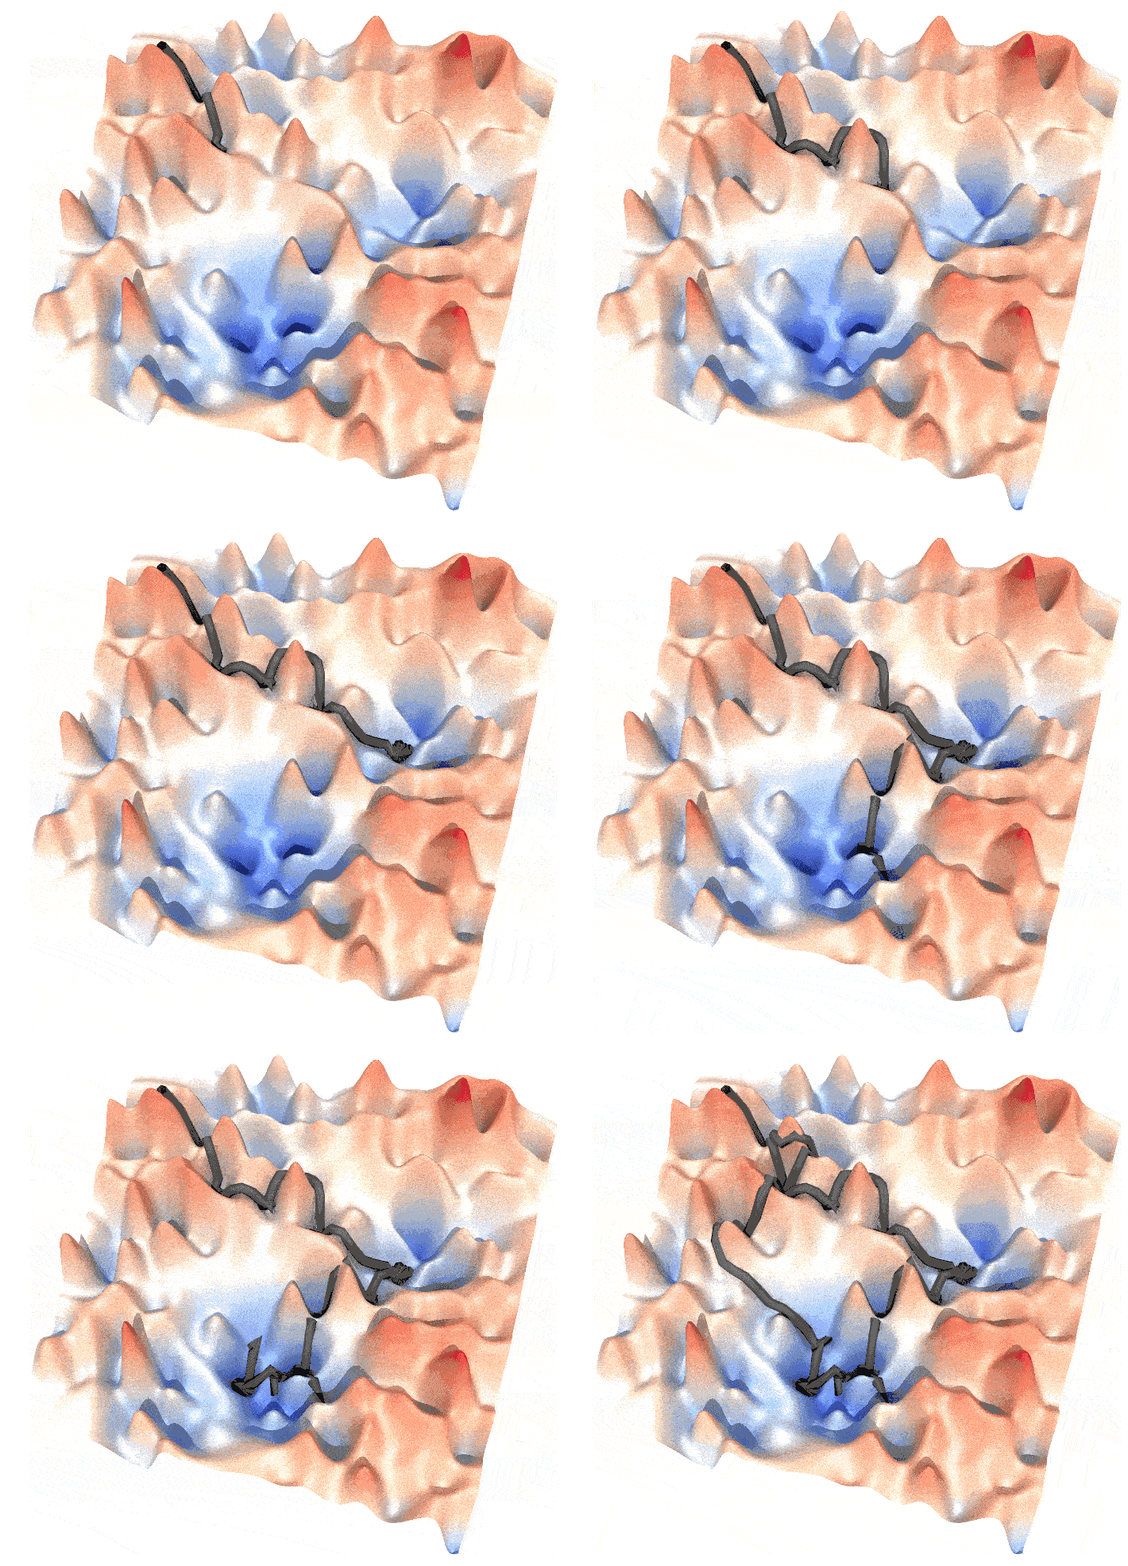
A path on energy landscape is like:

and this post is a guide to generate such animations.
Step 1: Generate the Energy Landscape
An energy landscape is essentially an energy function $U(\mathbf{x})$. This function can be created in various ways. For example, you might generate a series of Gaussian functions with random parameters $\mu_i$, $\sigma_i$, and weight factors $\omega_i$. From these, you can construct a probability function $P(\mathbf{x}) = \sum_{i=1}^N \omega_i G(\mathbf{x}; \mu_i, \sigma_i)$. The energy function $U(\mathbf{x})$ is then derived using Boltzmann inversion: $U = -k_B T \log P$ .
In the example above, I generated a series of Mexican hat functions with varying parameters ($a$), ($b$), and locations.
Step 2: Generate the Path
A path is determined by the dynamics of the system, such as $\dot{\mathbf{x}} = -\nabla U(\mathbf{x})$ or $\ddot{\mathbf{x}} – \dot{\mathbf{x}} = -\nabla U(\mathbf{x})$. By integrating from a starting point, you can generate a path. In our example, the walker follows a cyclic path, which requires an understanding of the Lagrangian.
A walker on an energy surface from point $A$ to $B$ takes the “canonical path” where the Lagrangian is minimized. The probability of the walker being at $A$ at time $t_0$ and reaching $B$ at time $t_1$ is given by:
$$
P(\mathbf{x}_A, t_0 \mid \mathbf{x}_B, t_1) = \frac{1}{Z} \int_{\mathbf{x}(t_0) = \mathbf{x}_A}^{\mathbf{x}(t_1) = \mathbf{x}_B} \mathcal{D}\mathbf{x} \exp\left(-\int_{t_0}^{t_1} L(\mathbf{x}, \dot{\mathbf{x}}, t) \, dt\right)
$$
Maximizing this probability implies minimizing the Lagrangian $L$ (saddle point approximation). Given $L = T – U$ with $T \propto \dot{\mathbf{x}}^2$, we can discretize the integral of $L$ as:
$$
L = \sum_{i=0}^N \lambda_1 (\mathbf{x}_{i+1} – \mathbf{x}_i)^2 – U(\mathbf{x}_i)
$$
where $\mathbf{x}_0 = \mathbf{x}_A$ and $\mathbf{x}_N = \mathbf{x}_B$. Here, $\lambda_1$ is a hyperparameter controlling the path’s tightness. Our goal is to find a series of $\mathbf{x}_i$ that minimizes $L$. This can be achieved using scipy.optimize.minimize
Step 3. Generate the animiation
The output can be drawn by mayavi, in the example I draw the frames of the animation by povray, where .pov files were generated by mayavi. The trajectory is a thick line that slightly shifted higher than the energy landscape surface to ensure a clear view. You can also draw a big point (sphere) at the forefront of a trajectory, to emphasize the walker.
To begin with, I must emphasize that this program was not originally deemed necessary. The story dates back to a lab meeting almost six years ago. During the meeting, a student using the GPC instrument complained that the software couldn’t handle batch data processing because it was a “premium” feature, requiring an additional ~$5000 USD fee. After the meeting, I decided to write this program. It includes two main functions: a baseline correction function and a GPC fitting function, which allows data to be further corrected using Mark-Houwink equations. I had forgotten about this program for a long time until recently, when I encountered a peak-finding problem that required baseline correction, and I rediscovered this old program.
import numpy as np
from scipy import signal
from scipy import sparse
from scipy.sparse.linalg import spsolve
# Function for baseline detection using Continuous Wavelet Transform (CWT)
def baseline_cwt_br(t, y, widths=np.arange(1, 61), wavelet=signal.ricker, theta_iter=2, deg=5):
r'''Automatic baseline detect algorithm via CWT.
by Carlo G. Bertinetto and Tapani Vuorinen, 2014
DOI: 10.1366/13-07018, Volume 68, Number 2, 2014. APPLIED SPECTROSCOPY
'''
# Compute the Continuous Wavelet Transform (CWT) of the input signal
cwt_mat = signal.cwt(y, wavelet, widths)
# Compute entropy for each scale (width) to find the optimal scale
cwt_mat_p = np.abs(cwt_mat) # Take absolute value to handle negative peaks
cwt_mat_n = cwt_mat_p / np.sum(np.abs(cwt_mat_p), axis=1)[:, None] # Normalize
H_w = -np.sum(np.nan_to_num(cwt_mat_n * np.nan_to_num(np.log(cwt_mat_n))), axis=1) # Compute entropy
# Find the scale (width) with the minimum entropy
ind_wh = np.argmin(H_w)
wh = widths[ind_wh]
cwt_min = cwt_mat[ind_wh]
# Evaluate threshold using histogram method
n = 200 # Initial number of bins
_count = 0
while _count < theta_iter:
n_old = n
p, e = np.histogram(cwt_min, bins=n) # Compute histogram
e = e[:-1]
ind = np.logical_and(p >= p.max() / 3, p <= p.max())
sigma = (np.sum((e[ind])**2 * p[ind]) / p[ind].sum())**0.5 # Compute standard deviation
n = int(8 * (cwt_min.max() - cwt_min.min()) / sigma) # Update number of bins
if (n - n_old) / n_old < 0.05:
_count += 1
# Define baseline indices based on the threshold
n_ind = np.logical_and(cwt_min > -3 * sigma, cwt_min < 3 * sigma)
theta = sigma * (0.6 + 10 * cwt_min[n_ind].shape[0] / cwt_min.shape[0])
baseline_ind = np.logical_and(cwt_min > -theta, cwt_min < theta)
# Iterative polynomial fitting until convergence
b_p = y[baseline_ind]
b_t = t[baseline_ind]
converge = False
while not converge:
n = b_p.shape[0] // 100 # Segment length
b_p_old = np.copy(b_p) # Copy previous baseline points
p = np.polyfit(b_t, b_p, deg=6) # Fit polynomial of degree 6
pi = np.poly1d(p)(b_t) # Evaluate polynomial
std = np.mean((pi - b_p)**2) ** 0.5 # Compute standard deviation
ind1 = b_p - pi < 1.5 * std # Identify points within 1.5 * std
b_p = b_p[ind1] # Update baseline points
b_t = b_t[ind1]
p = np.polyfit(b_t, b_p, deg=deg) # Fit polynomial of specified degree
pi = np.poly1d(p)(t) # Evaluate polynomial
ind2 = y - pi < 0 # Identify points below the polynomial
segs = np.cumsum(np.r_[
0, np.diff(np.flatnonzero(np.diff(ind2)) + 1, prepend=0, append=ind2.shape[0])
])
for i in range(1, segs.shape[0]):
seg = ind2[segs[i-1]:segs[i]]
if seg[0] and (seg.shape[0] >= n):
b_p = np.append(b_p, y[segs[i-1] + seg.shape[0] // 2])
b_t = np.append(b_t, t[segs[i-1] + seg.shape[0] // 2])
# Check for convergence
if b_p_old.shape[0] == b_p.shape[0]:
if np.allclose(b_p_old, b_p):
converge = True
return p(t) # Return the computed baseline
This baseline correction algorithm was adapted from a method where the authors used an iterative approach. They fit the baseline, identified from the slow modes of the CWT, with polynomials. In each iteration, outliers are removed until the baseline converges. This method is adequate for signals with high signal-noise ratio, for noisy systems, the signal should be smoothed first.
The second part is the GPC-processing part, the codes are here:
import warnings
import argparse
import numpy as np
import pandas as pd
from scipy.integrate import simps
from scipy.signal import detrend
from matplotlib import pyplot as plt
from scipy import sparse
from scipy.sparse.linalg import spsolve
from baseline import snr
from baseline import baseline_cwt_br
import re
description = """
A simple GPC data analysis program, for
I aint f**king believe that a simple GPC
data analysis program is
worth 30000 RMB aka $5000 USD.
"""
arg_parser = argparse.ArgumentParser(
description=description, formatter_class=RawTextHelpFormatter)
arg_parser.add_argument('-S', '--standard',
dest='standard', type=float, metavar="standard curve",
nargs=2, help="Standard curve, slope `k' and intercept `b0'.")
arg_parser.add_argument('-O', '--output',
metavar='Output file',
default='mwd', dest='out_put',
help="Optional, use `mwd' as default prefix.")
arg_parser.add_argument('gpc_file(s)',
nargs=+, type=str
help='GPC data file(s).')
arg_parser.add_argument('-M', '--method',
nargs=+, type=str, dest='method', metavar='Detector(s).',
help='GPC detector(s).')
args = arg_parser.parse_args()
alvars = vars(args)
k, b0 = alvars['standard']
#k, b0 = -0.5005413052736007, 11.278597269990836 # test data.
# TODO: add combination mode of detectors.
detector = alvars['method']
#mark_houwink = pd.read_csv('mh.dat', sep='_')
# MH equation: K_1 M_1^{a_1} = K_2 M_2^{a_2}, universal calibration curve.
# k2, b0_2 = k * (a_2 + 1)/(a_1 + 1), b0 + k * np.log(K_2/K_1)/np.log(10) # mk equation to transfer M1->M2
# k, b as function of K, a, if we know the k, b0 and K_1, a_1 for a certain polymer.
def std_func(t, k, b0):
r'''GPC standard curve t->M.'''
return np.exp((k*t + b0)*np.log(10))
#TODO: add dedrend and find_peak here, or perhaps a GUI?
# RI signal = K_{RI} * dn/dc * c
# LS signal = K_{LS} * (dn/dc)^2 * Mw * c
# Visc. signal = K_{visc} * IntrisicViscosity * c
ret = []
files = alvars['gpc_file(s)']
for i, f in enumerate(files):
data = np.loadtxt(f)
t, y = data.T[0], data.T[1]
while True:
plt.plot(t, y)
plt.show()
s, e = [float(_) for _ in re.split(',\s*|\s+',input("Trim the GPC, start, end: ")) if _ != '']
inds = np.logical_and(t>s, t<e)
t1 = t[inds]
y1 = y[inds]
plt.plot(t1, y1)
plt.show()
if input("End trim? [y|n] ") == 'y': # trim data
break
b = baseline_cwt_br(t1, y1) # baseline correction
plt.plot(t1, y1-b)
plt.show()
t = t1
y = y1
m, i = std_func(t, k, b0), y
if detector == 'RI':
p = i/m * 1/abs(k*np.log(10)) # P(t) -> P(M); the 1/m factor is used to transform P(Log M) -> P(M)
np.savetxt('%s_%03d.txt' % (alvars['out_put'], i), np.vstack([m, np.abs(p/simps(p, m))]).T, fmt='%.6f')
There are still unresolved “TODO” items, which I hope to complete someday. These may include new functions, such as deconvolution for two-step polymerization.
Creating account
To create an account for ChatGPT, please note that it is currently inaccessible in mainland China. Therefore, you will need two tools to register accounts from OpenAI:
sms-activate.org to receive the activation SMS.vvacard.com. It is recommended to use a stable web proxy that matches the geographic information of your proxy with the card’s address.API proxy
While the web UI of OpenAI is free to use, GPT-4 comes with a $20/month charge. Additionally, using a proxy may result in your account being blocked. To avoid this issue, you can utilize an API proxy. OpenAI recently announced that GPT-4 models are available for paid API accounts, allowing you to pay on demand. We recommend the GitHub project Yidadaa/ChatGPT-Next-Web for a ChatGPT web UI. It supports one-click deployment on Vercel and authentication by setting access codes.
In addition to the web UI service, certain localized projects such as binary-husky/gpt_academic on GitHub require access to the OpenAI API address https://api.openai.com/v1/chat/completions. While the binary-husky/gpt_academic project provides a PROXY option, it is more reliable to deploy a reverse proxy for the OpenAI API address. We recommend the projects gaboolic/cloudflare-reverse-proxy and gaboolic/vercel-reverse-proxy, both of which provide one-click deployment on Vercel/Cloudflare. For personal use, the free plans of Vercel/Cloudflare should suffice. Alternatively, using Nginx on a VPS is also a viable solution.
The final step involves setting up a domain since Vercel’s domains are banned in China.
Although this post is unrelated to the title, I have realized that after using GPT-4 and tools like binary-husky/gpt_academic, I feel that I am no longer necessary. This tool can teach, deduce, perform mathematical calculations, write and debug code, and even write academic papers and respond to reviewers. It is far more capable than me.
*UPDATE* Now Vercel pass the IP address of user to OpenAI so that you have to access Vercel client with valid proxy.